

Every bearded gentleman faces the same frustration: uneven patches, split ends creeping up your jawline, and that stubborn moustache hair that refuses to sit flat. You've invested time growing your beard, applied quality oils and balms, yet your facial hair still looks untamed. The problem isn't your beard itself-it's the tool you're using to shape it. Electric trimmers buzz away entire sections, leaving harsh lines and an artificial appearance. Regular household scissors? They pull, tug, and create uneven cuts that damage the hair shaft. What you need is a pair of purpose-built beard trimming scissors that give you surgical precision whilst protecting each individual hair.
Why Beard Trimming Scissors Outperform Electric Tools
Electric trimmers dominate the grooming market, yet professional barbers and discerning gentlemen consistently reach for scissors when detail work matters. The difference lies in control and hair health.
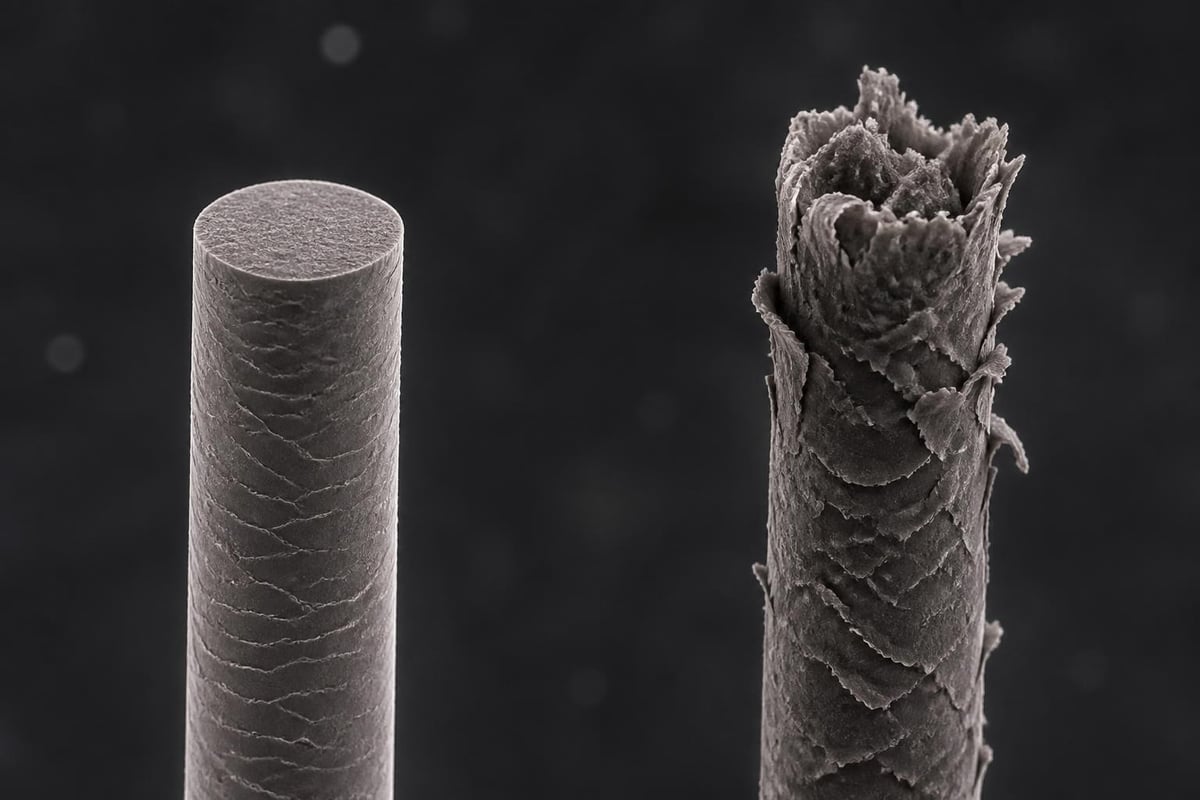
When you use clippers, the vibrating motor pulls hair into the blade guard before cutting. This yanking motion stretches the hair shaft, creating microscopic tears along the cuticle-the protective outer layer of each strand. Over weeks and months, these micro-tears accumulate, leading to split ends and frizz that no amount of beard oil can fully tame.
The Science Behind Clean Cuts
Beard trimming scissors slice through hair with a shearing action that leaves the cuticle intact. According to dermatologist-backed guidance on beard care, sharp shears create beveled ends that seal naturally, preventing moisture loss and environmental damage. This matters because your beard hair lacks the sebum production of scalp hair-it's inherently drier and more prone to brittleness.
The metallurgy behind professional scissors directly impacts cutting performance:
| Steel Type | Rockwell Hardness | Best For | Durability |
|---|---|---|---|
| 440C Stainless | 56-58 HRC | Daily home use | 12-18 months |
| VG-10 Japanese | 59-61 HRC | Detail work | 24-36 months |
| ATS-314 Cobalt | 60-62 HRC | Professional use | 36-48 months |
Scissorpedia's comprehensive steel guide explains how carbon content and heat treatment determine edge retention. Higher Rockwell hardness (HRC) means the blade maintains its sharpness through hundreds of cutting sessions.
Choosing Your Perfect Pair: Length, Weight, and Geometry
Walk into any barbershop, and you'll notice the professionals never use the same scissors for every task. Beard work demands specific dimensions that differ from hair-cutting shears.
Optimal Blade Length for Facial Hair
The 4.5 to 5.5-inch range dominates professional beard work for good reason. Shorter blades (under 4 inches) lack the leverage needed for smooth, continuous cuts through dense facial hair. You'll find yourself making choppy, repetitive snips that create visible demarcation lines.
Longer blades (over 6 inches) introduce instability. Your hand position changes to accommodate the extra length, reducing fine motor control exactly when you're trimming near sensitive areas like your upper lip or under your nose.
- 4.5-inch blades: Ideal for moustache detailing and sideburn precision
- 5-inch blades: All-purpose length for cheek lines and beard shaping
- 5.5-inch blades: Best for longer beards requiring scissor-over-comb techniques
Weight Distribution and Finger Fatigue
Professional-grade beard trimming scissors balance weight between the blades and handles. Pick up a pair and hold them at rest-your fingers shouldn't strain to keep them level. This equilibrium prevents the cramping that plagues longer grooming sessions.
Expect quality scissors to weigh between 45 and 65 grams. Lighter models fatigue your thumb muscle during extended use. Heavier versions feel secure but tire your hand over ten minutes of continuous cutting.
Mastering Techniques: From Scissor-Over-Comb to Point Cutting
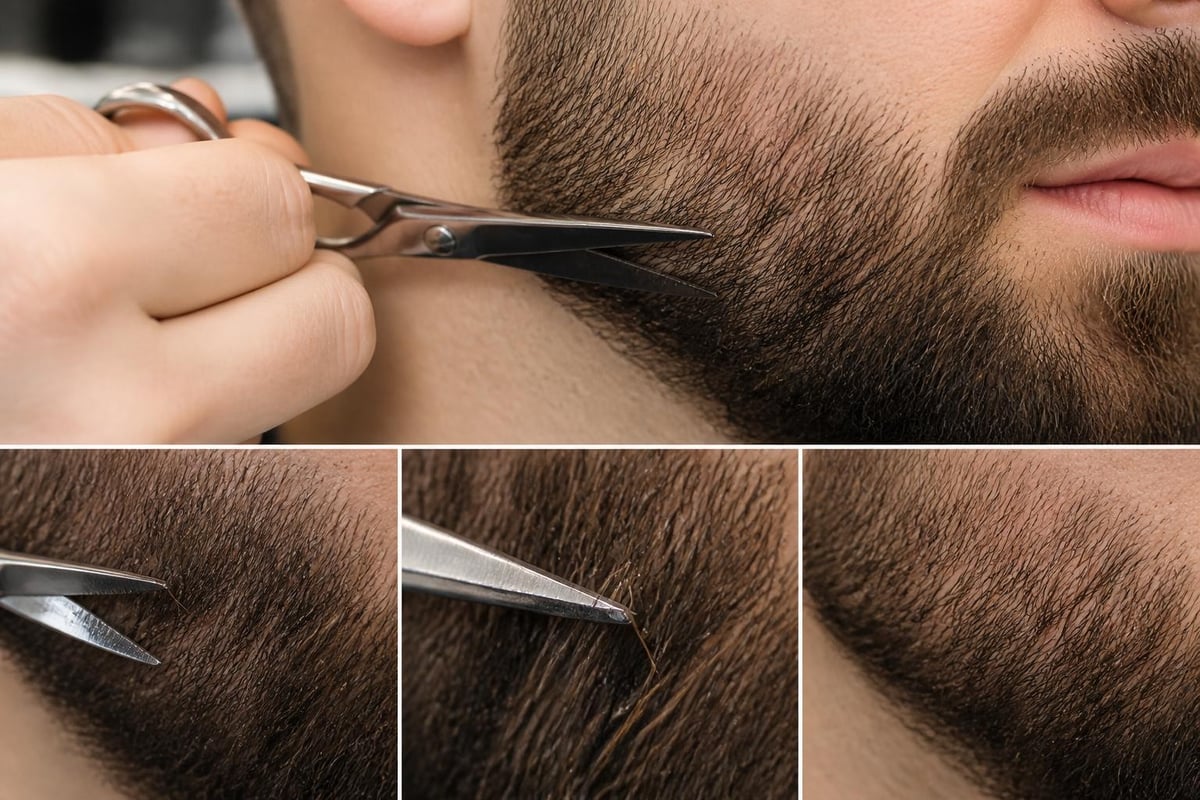
Owning premium beard trimming scissors means nothing without proper technique. The methods below transform wild growth into sculpted facial hair that complements your face shape.
The Scissor-Over-Comb Foundation
This cornerstone technique creates even length across broad beard surfaces:
- Comb through a section of beard hair against its natural growth direction
- Lift the comb slowly until hair protrudes through the teeth at your desired length
- Hold scissors parallel to the comb, blades resting against the teeth
- Cut along the comb line with smooth, continuous strokes-avoid choppy snips
- Work in horizontal rows from bottom to top, maintaining consistent tension
Professional barbers complete full beard trims in under fifteen minutes using this method. Your first attempts might take thirty minutes, but muscle memory develops quickly.
Point Cutting for Natural Texture
Blunt cuts across your beard line create a harsh, manicured appearance. Point cutting softens edges whilst removing bulk:
- Angle your scissors at 45 degrees to the hair shaft
- Snip into the ends rather than straight across-imagine notching small V-shapes
- Vary your depth from 2mm to 5mm to create dimension
- Focus on the perimeter where your beard meets bare skin
This technique works brilliantly on cheek lines and necklines, creating gradual transitions that look professionally blended.
Hygiene and Maintenance: Protecting Your Investment
The same scissors that precisely trim your beard also collect dead skin cells, sebum, and product residue. Neglect leads to corrosion, dull blades, and bacterial growth that transfers directly to your face.
Daily Cleaning Protocol
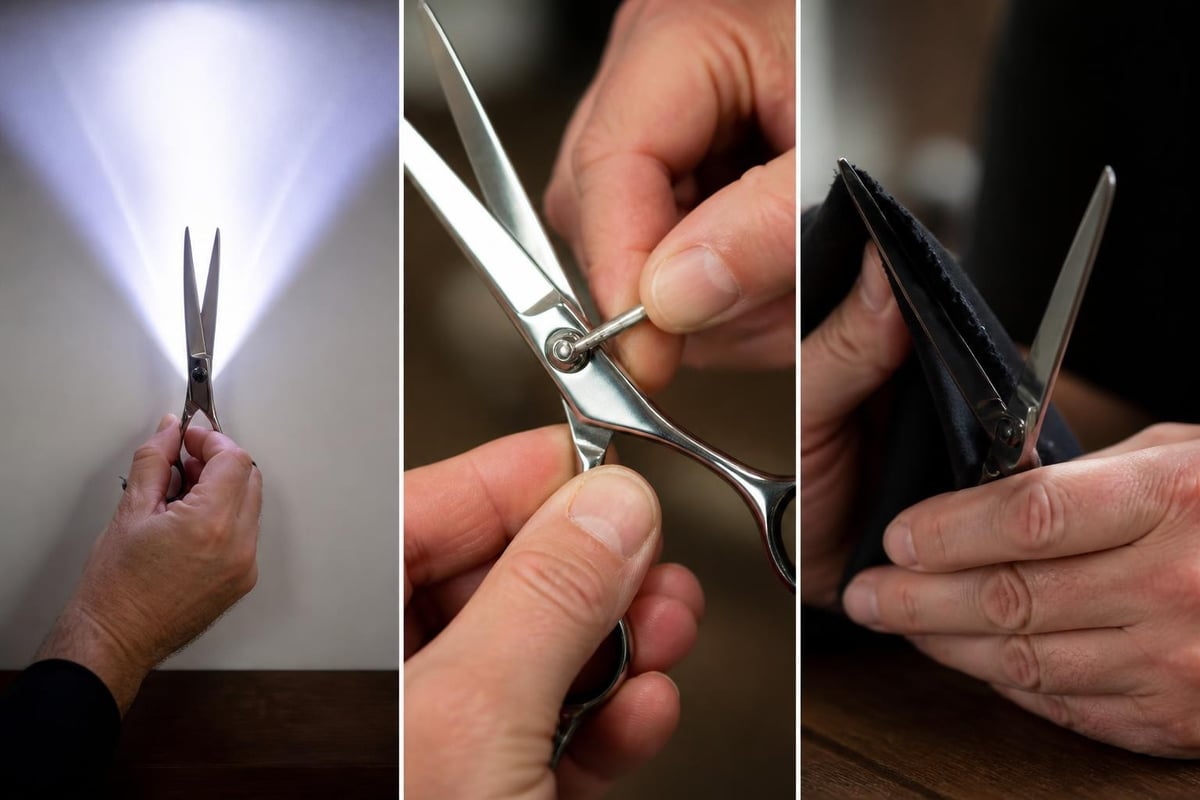
After each use, your beard trimming scissors require three minutes of care:
- Wipe both blades with a dry microfiber cloth to remove hair and debris
- Apply one drop of mineral oil or specialized scissor lubricant to the pivot screw
- Open and close the scissors five times to distribute oil across the friction points
- Store in a protective case or leather pouch-never loose in a drawer where blades contact hard surfaces
California's barbering disinfection guidance outlines professional standards that home users should adapt. While you're not dealing with multiple clients, the same principles of instrument care apply.
Weekly Deep Disinfection
Once weekly, especially if you're managing personal care routines that include beard oils and balms, your scissors need thorough sanitization:
- Mix a solution of 70% isopropyl alcohol and distilled water in a small bowl
- Submerge the blades for 60 seconds (avoid soaking wooden handles or finger rests)
- Scrub the pivot area with a clean toothbrush to dislodge trapped debris
- Rinse with distilled water to remove alcohol residue
- Dry immediately with compressed air or a lint-free cloth
- Re-oil the pivot before storage
The DC Health barbering regulations emphasize that proper disinfection prevents folliculitis and other skin infections that compromise beard health.
Material Science: Understanding Stainless Versus Carbon Steel
The debate between stainless and carbon steel beard trimming scissors mirrors discussions in cutlery and surgical instruments. Each material offers distinct advantages tied to your grooming habits.
Stainless Steel: The Low-Maintenance Workhorse
Modern stainless formulations resist corrosion whilst maintaining acceptable edge retention. Voestalpine's technical documentation on surgical-grade stainless steels reveals how chromium content above 13% creates a passive oxide layer that self-repairs minor scratches.
Benefits for home use:
- Withstands bathroom humidity without rust
- Tolerates alcohol-based disinfectants
- Requires minimal maintenance beyond basic cleaning
- Holds an edge through 6-12 months of regular use
Trade-offs:
- Won't achieve the razor-sharp edge of carbon steel
- Slightly softer feel during cutting
- May require professional sharpening sooner
Carbon Steel: Professional Performance with Commitment
High-carbon tool steels deliver unmatched sharpness but demand religious maintenance. A single session cutting damp beard hair followed by overnight storage without drying can surface-rust carbon blades.
These scissors excel when you've established a comprehensive grooming routine that includes daily tool care. The cutting experience feels effortless-hair separates before the blade fully closes, rather than requiring you to complete the cutting stroke.
Integrating Scissors Into Your Complete Beard Strategy
Beard trimming scissors represent one tool within a broader ecosystem of products and techniques. The healthiest beards combine mechanical shaping with nutritional support from quality formulations.
Your cutting technique determines hair structure, but the products you apply influence growth density, texture, and overall vitality. When you're sculpting your beard with precision scissors, you're creating the framework that products will enhance and protect.
This is where a comprehensive approach delivers transformative results. The 90-Day Beard Challenge combines eight scientifically-formulated products-from follicle-stimulating Beard Booster to protective Hydro-Lock Balm-with the precision shaping that quality scissors enable. The synergy between proper trimming technique and targeted nutrition creates density and definition that neither approach achieves alone.

Building Your Grooming Toolkit
Professional results require systematic approaches rather than isolated products:
| Tool/Product | Primary Function | Frequency | Works With |
|---|---|---|---|
| Beard trimming scissors | Precision shaping, split end removal | Weekly | Comb, mirror |
| Boar bristle brush | Distribution of natural oils | Daily | Beard oil, balm |
| Wide-tooth comb | Detangling, scissor-over-comb work | Daily | Scissors, conditioner |
| Beard oil | Hydration, cuticle protection | 2x daily | Brush, heat |
| Conditioning balm | Styling hold, environmental barrier | Daily | Scissors (for shaping) |
Notice how scissors integrate with every other tool. You brush to distribute product, comb to identify uneven length, then trim to create shape. The cycle repeats as your beard grows, with each element supporting the others.
Common Mistakes That Damage Your Beard and Scissors
Even quality beard trimming scissors perform poorly when technique fails. These errors plague beginners and experienced groomers alike.
Cutting Damp or Wet Facial Hair
Water swells the hair shaft by up to 30%, creating false length that disappears when your beard dries. You'll trim conservatively, check your work in the mirror, then watch your beard shrink as it air-dries-revealing you removed far more length than intended.
Always trim a completely dry beard. If you've just showered, blow-dry on cool setting or wait 30 minutes before reaching for your scissors.
Rushing Through Detail Work
Your moustache contains some of the most visible hairs on your face, yet receives the least careful attention. Gentlemen rush through upper lip trimming, snipping quickly near their nose without proper lighting or magnification.
Slow down. Position a 5x magnifying mirror in bright, natural light. Trim individual moustache hairs that overhang your lip line, cutting at a slight upward angle to create the illusion of fuller density beneath.
Neglecting Blade Alignment
Scissors cut through a precise shearing action where both blades meet along their entire length simultaneously. Drop your scissors once, and you might knock the alignment out by fractions of a millimeter-enough to create a gap that bends hair rather than cutting it.
Test alignment monthly: Hold scissors up to bright light and close them slowly. You shouldn't see light between the blades at any point during the closing stroke. If light appears, professional adjustment is required.
Selecting Ergonomic Designs for Long-Term Comfort
Hand anatomy varies dramatically between individuals. Scissors designed for someone with long, slender fingers will cramp a person with shorter, thicker digits.
Offset Handle Versus Symmetrical Design
Traditional symmetrical scissors position thumb and finger holes directly opposite each other. This alignment forces your thumb to extend fully during each cut, engaging the thenar muscles at the base of your thumb for extended periods.
Offset handles drop the thumb hole lower by 15-25mm, allowing your hand to maintain a more natural position. Your forearm, wrist, and fingers align in a straighter line, reducing strain during sessions longer than five minutes.
Try this test: Hold your dominant hand palm-up, fingers naturally curved. Notice how your thumb sits lower than your fingers? Offset scissors mirror this natural position.
Finger Rest Placement
That small curved extension near the pinky hole isn't decorative. The finger rest (or tang) provides a counterbalance point that stabilizes the scissors during precision work.
Position your ring finger against the rest whilst your middle finger controls the lower handle. This three-point contact (thumb, middle finger, ring finger) creates a stable tripod that absorbs tremors and allows micro-adjustments during cutting.
Advanced Styling: Creating Defined Lines and Gradients
Basic maintenance keeps your beard neat. Advanced techniques transform facial hair into a sculpted element that enhances your facial structure.
Establishing Clean Cheek Lines
The cheek line defines where your beard meets bare skin along your upper cheek. Natural growth patterns rarely create symmetrical, aesthetically pleasing boundaries.
Mark your line before cutting:
- Identify two reference points: The corner of your mouth and the point where your sideburn meets your ear
- Visualize a straight line connecting these points (or a gentle upward curve if you prefer)
- Use a washable marker to draw the line on your skin
- Trim conservatively above the marked line, removing stragglers
- Blend the transition using point-cutting techniques
Gradient Fading With Scissors
Creating a fade-gradually transitioning from longer beard hair to bare skin-traditionally requires multiple clipper guard lengths. Skilled scissor work achieves the same effect with more natural results.
Work in 5mm horizontal bands:
- Top band: Leave at full length
- Second band: Remove 20% of length using scissor-over-comb
- Third band: Remove 40% of length
- Fourth band: Remove 60% of length
- Bottom band: Remove 80%, leaving barely visible stubble
Blend between bands using point cutting to eliminate visible demarcation lines.
Environmental and Sustainability Considerations
Quality beard trimming scissors represent a lifetime investment when properly maintained. This longevity contrasts sharply with disposable electric trimmers that require replacement every 18-24 months.
Design Life-Cycle analysis of scissors reveals that high-grade steel shears, despite their higher initial manufacturing impact, distribute environmental cost across decades of use. The embodied energy in premium scissors (the total energy required for material extraction, processing, and assembly) amortizes over thousands of cutting sessions.
Sustainability advantages:
- No battery production or disposal concerns
- No electricity consumption during use
- Repairable rather than disposable-pivot screws can be tightened, blades professionally sharpened
- Recyclable at end of life (100% steel construction)
- Reduced plastic packaging compared to electric alternatives
Choosing scissors over electric trimmers aligns with a broader shift toward durable, maintainable grooming tools that reduce consumption whilst delivering superior results.
Sharpening Services Versus DIY Maintenance
Even premium beard trimming scissors eventually dull. The question becomes whether to sharpen them yourself or seek professional services.
When to Sharpen
Monitor these warning signs:
- Hair bends or folds rather than cutting cleanly
- You must close scissors completely to sever hair (should cut halfway through the stroke)
- Visible nicks or chips along the cutting edge
- Uneven cutting on one side only
Expected timelines:
- Daily home use: 12-18 months
- Weekly use: 24-36 months
- Professional use: 6-12 months
Professional Sharpening
Specialist scissor sharpeners use convex-edge grinding wheels and precise angle jigs that recreate factory specifications. The service typically costs £15-25 and takes 3-5 business days.
What they do:
- Restore original blade angle (typically 40-45 degrees for beard scissors)
- Remove micro-chips and rolled edges
- Rebalance blade tension
- Polish cutting surfaces to reduce friction
DIY Limitations
Home sharpening with whetstones or pull-through sharpeners often creates more problems than it solves. You might restore temporary sharpness, but without proper angle consistency, the edge degrades rapidly and unevenly.
If you insist on DIY sharpening, invest in a proper jig that maintains consistent angles. Expect a £60-80 initial investment for quality equipment.
Storing Your Scissors Between Sessions
Environmental factors degrade scissors faster than actual use. Bathroom storage exposes blades to temperature fluctuations, humidity, and aerosolized hairspray or other grooming products.
Optimal Storage Conditions
Create a dedicated storage solution:
- Leather pouches or wooden cases buffer against moisture
- Silica gel packets (the small desiccant bags) absorb ambient humidity
- Store in a bedroom drawer rather than bathroom cabinet
- Keep away from heat sources (radiators, sunny windowsills)
Some professionals hang scissors blade-down on magnetic strips, but this introduces risk. A knocked elbow or curious child can send expensive shears crashing to tile floors.
Travel Considerations
Transporting beard trimming scissors in luggage requires protection from both physical damage and TSA inspection. Sharp objects in carry-on bags face confiscation, so check scissors in registered luggage.
Wrap blades in bubble wrap, then secure with rubber bands. Place in a hard-shell case (repurposed sunglasses cases work perfectly) to prevent crushing under heavier items.
Pairing Scissors With Complementary Tools
No single tool handles every grooming task. Strategic combinations expand your capabilities whilst maintaining the precision that defines quality beard care.
The Brush-Comb-Scissors Trinity
Professional barbers work in this sequence:
- Boar bristle brush removes surface debris and distributes natural oils
- Wide-tooth comb detangles and identifies problem areas
- Beard trimming scissors address specific irregularities revealed by combing
This progression moves from general to specific, ensuring you don't waste time cutting individual hairs whilst bigger issues exist.
When to Use What
| Grooming Goal | Primary Tool | Secondary Tool |
|---|---|---|
| Daily maintenance | Brush + comb | Scissors (spot fixes) |
| Weekly shaping | Scissors | Comb (guide) |
| Style changes | Scissors | Mirror + lighting |
| Product application | Brush | Comb (distribution) |
| Travel/emergency | Scissors | Compact comb |
Notice how scissors feature in nearly every scenario, whilst electric tools appear nowhere. Once you develop proper cutting technique, electronic alternatives become unnecessary.
Training Your Eye for Symmetry and Balance
Technical skill with beard trimming scissors means little without aesthetic judgment. The best mechanical cutters still create lopsided beards if their eyes can't evaluate proportion.
The Two-Mirror Technique
Position a handheld mirror to view your profile whilst facing your wall-mounted mirror. This dual-angle perspective reveals asymmetries invisible from the front.
Common imbalances include:
- Left cheek line higher than right (or vice versa)
- Moustache length uneven between sides
- Sideburn connection point inconsistent
- Neckline curve more pronounced on one side
Photograph your beard weekly from front, left 45°, right 45°, and profile angles. Compare images to track progress and identify recurring problem areas.
Reference Points and Facial Landmarks
Beards exist in relation to your facial structure. Successful styling enhances bone structure rather than fighting it.
Identify your landmarks:
- Cheekbones (highest point of your upper face)
- Jawline angle (where jaw turns from vertical to horizontal)
- Chin point (foremost point of your chin)
- Lip corners (natural smile line endpoints)
Your beard should emphasize these features. Round faces benefit from longer chin hair that creates vertical length. Square jaws look best with fuller cheeks that soften angular lines.
Mastering beard trimming scissors transforms grooming from a chore into a craft that rewards patience and attention to detail. The precision these tools offer-when paired with proper technique and quality products-creates facial hair that enhances rather than hides your features. Whether you're maintaining a short, corporate style or cultivating a full traditional beard, the fundamentals remain constant: sharp tools, clean cuts, and consistent care. Onesociety supports your complete grooming journey with scientifically-formulated products that work in harmony with mechanical shaping, helping you achieve the density, texture, and health that make precision trimming worthwhile.